Before we do photography activities, we recommend setting the camera in order to get the first pictures we want. These settings determine the specifications of the overall picture.
RESOLUTIONOne of the first things to consider is making sure its resolution is set to the quality level you want to use. Digital camera gives a choice of several quality settings ranging from 640 x 480 all the way up to the camera’s maximum setting.
The higher the file resolution, the larger the print you can make. The size of your print depends largely on the printer you’re using and how well the image is set up in an image editing program. As printer and sensor technologies improve, it becomes possible to make bigger prints from smaller files.
I always recommend choosing a resolution setting that enables you to make good quality prints. Never mind that you may only want to use the images for your web site or for presentations.
I suggest this for two reasons. First, you never know when you’re going to get a remarkable or memorable image. If this happens while you’re shooting at a low-resolution setting, there’s not much you can do to get that lost resolution back. Second, a higher resolution gives you the chance to crop your image as needed while still retaining enough image quality for effective use.
WHITE BALANCEFilm comes with various light ratings because different types of light have different color casts that can affect the quality of your photos. A classic example is the heavy green cast film prints suffer from when pictures are taken under florescent lighting. Just because photography has gone digital, it doesn’t mean that problems from different types of light have been solved. It just means that the digital photographer has more control over these lighting situations than his film counterpart.
The easy way to handle various lighting situations is to make sure your camera’s white balance (WB) setting is on auto, and just forget about it. Most camera’s auto white balance features do a good enough job of choosing the right setting.Sometimes though, the right setting isn’t the best setting. There’s no rule that says that just because it’s sunny out, your white balance has to be set for sunlight. You can experiment with white balance settings to create different colorcasts that may be more in tune with the image you want to create. When in doubt, take two pictures.
ISOISO (International Organization for Standards) is a measure of how sensitive your film or recording sensor is to light. Consider your choice of this ISO settings. Digital cameras enable you to change ISO settings to adapt to both changing lighting conditions and also to respond to different shooting situations. Most point-and-shoot digital cameras offer ISO settings of 100, 200, and 400, with each increase doubling the sensor sensitivity to light. Many DSLRs offer even more choices and a greater range of sensitivities.
Light sensitivity doesn come for free. As you change ISO settings to compensate for falling light levels, noise becomes more of an issue. Noise is a problem caused by individual pixels within the camera sensor misfiring as their sensitivity is boosted. This problem shows up as individual pixels in the image being the wrong color. Noise becomes most apparent in shadow areas where, instead of a solid black, you find individual red, yellow, and green pixels mixed in with the black ones.
Generally, you want to choose the lowest ISO setting that gives you a workable combination of lens opening and shutter speed for the kinds of photos you want to make. Remember, changes in ISO setting affect the overall exposure needed to expose an image properly. Your lens opening and shutter speed are part of that equation, so changing ISO affects those settings too.
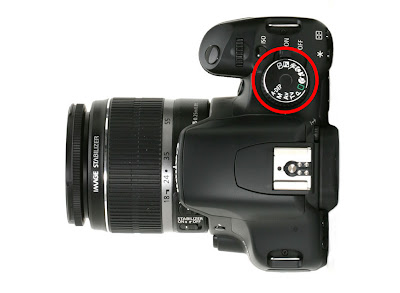
EXPOSURE SETTINGreally good picture is the right combination of shutter speed and lens opening (aperture). Most cameras give you a series of choices for settings that achieve different exposure goals. All the way down to full manual control by the user.
Here are some ways you may have available in the camera to identify the mode:
Manual exposureManual mode: You control both shutter speed and aperture. This mode gives you complete control over the image-making process, but you have to keep a close eye on changing light conditions.
Program mode: Most cameras follow an algorithm designed to create the best chance of an acceptable image. Because the major cause of rejected photos is the perception of poor focus, program mode algorithms place a priority on getting the camera’s shutter speed fast enough to prevent blur from camera shake. Indeed, even in this day and age of high-speed auto-focus, many apparently out-of-focus images are actually blurred from camera shake and not out-of-focus from poor focusing technique. As light levels increase, the algorithm chooses faster and faster shutter speeds until it reaches a speed that avoids blur from camera shake. The program then starts closing down the lens opening, which increases the area of sharpness throughout the image. Program mode is a nice, easy way of ensuring acceptable pictures. If you just want to grab a photo and go back to having fun, this is the right mode for you.
Shutter Priority mode: This mode lets the user pick the shutter speed and then the camera chooses the appropriate lens opening for proper exposure. There are a couple of ways to use this mode. One way is to use it to set a minimum shutter speed necessary to freeze action. The other is to set the camera to the slowest shutter speed necessary to prevent camera shake so that the camera stops the lens down to the smallest opening possible. This creates the maximum depth of field (depth of sharp focus) possible for the lighting conditions under which you’re working.
Aperture Priority mode (AV): This mode is the reverse of the previous mode. Here the user chooses the lens setting and the camera sets the shutter speed. Aperture Priority is useful for stopping action because the user can set the lens wide open so the camera chooses the fastest possible shutter speed. This mode can also work when you want to have exact control over the range of sharpness throughout the image such as for portraiture or landscape photography.
DEP mode: A mode offered by some cameras. This setting is for situations where you need to keep an exact area in sharp focus. DEP modes call for the user to select the near and distant focus points and then the camera picks an aperture (lens opening) setting that will keep everything within those two points sharp. Although this choice can produce nice results, remember that there’s no guarantee the resulting shutter speed will be fast enough to prevent blur from camera shake or stop motion. Using a tripod or setting the camera on a solid surface may be necessary.
Automated exposureSports mode: Represented by the icon of a person running. When you press this button, the camera chooses a shutter speed and aperture combination designed to freeze the motion of fast-moving athletes.
Landscape mode: Represented by the mountain icon. Press this button when you’re shooting scenic photos, and the camera picks settings that allow for the maximum depth of field. It also produces a sharp overall image without worrying about fast shutter speeds because there is little motion to worry about stopping.
Portrait mode: Represented by the head-and-shoulders icon. Press this button to activate the camera’s auto mode for portrait photography. This program opens the camera lens to create shallow depth of field and throws distracting backgrounds out of focus.
Macro mode: Represented by the flower icon. For close-up photography, press this button to activate the camera’s close focusing settings and to close the lens down to create the greatest possible depth of field. This mode should also turn on the camera’s LCD screen for use as an electronic viewfinder.